recreate --- a Gimp Script-Fu

recreate.scm automates the process of combining three grayscale images into a single RGB composite.

how do i download, install, and use it?

you need two things:

  1. a working installation of the gimp --- the gimp is a free (both as in free speech and free beer) image processing package for unix.  this implies that you have access to a unix system, since the windows and OS/2 versions of the gimp are very unstable and require tons of extra software.  for info on the gimp, see http://www.gimp.org
  2. a way to use the gimp, i.e. some form of X server, either a native Xserver on a unix console or a PC X server such as XWin32 or eXceed.

installation is very simple.

  1. download recreate.scm, which is a plain text file.
  2. place recreate.scm in your gimp scripts directory, either $HOME/.gimp/scripts for your personal scripts, or [gimp data dir]/scripts for global use (may require root access).
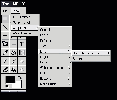
  3. The next time you start gimp (or refresh its Script-Fu subsystem) you should see a new menu item, [toolbox]/Xtns/Script-Fu/misc/Recreate Image from RGB -- simply choose this menu item to run the script.

for more info, read below...

cheesy, illustrative example

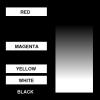
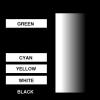
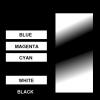
Begin with three grayscale images:
the red light plane the green light plane the blue light plane
TIFF TIFF TIFF
Now, open up the gimp, and navigate through the toolbox menus to find "Recreate Image from RGB". finding the script-fu in the gimp's menus  
Selecting this menu option brings up a dialog box, in which you may enter the filenames of the component images.

These filenames are relative to the directory from which you started gimp; it may be necessary to give full paths.  It's also a good idea to ensure the name is in double quotes, as shown.

Once the filenames are correct, click on "OK", and the Script-Fu will start working.

 
The script creates a new image, and copies the source images into the new image.  When the script finishes, it will display the new image to you.

The JPEG thumbnail image to the right shows just the original region of the source images.  However, if you click on the image, you will see a large JPEG image --- a 640x480 image filled with colorful video garbage, with the 256x256 pattern in the middle.  The large JPEG also has very poor image quality, thanks to the nature of the JPEG format...

Before you say, "Good grief, muppet, this script sucks!" let me explain: the TIFF version (linked at right and here) shows none of the JPEG's lossy image artifacts.  Look at that image for quality.

As for the large border of video garbage --- this is one of those split-personality bug/feature things.  The original intent of this script was to reconstruct video images, and video images are typically at 640x480 resolution.  While it's no problem to resize the newly created image to match the size of the component images, it was beyond the scope of the problem when i wrote the script.  This is slated as a future enhancement, but has a very low priority.  (It is an interesting artifact, however, which illustrates the gimp's tile-based memory management system.)

TIFF

a real-world example

The rasion d'etre of this script was to reconstruct the color image seen by a 3-ccd color camera from the images captured by the individual color channels.  The frame-grabber software captures a grayscale image of the same target from each color channel, saving them as lines_red.tif, lines_green.tif, and lines_blue.tif, respectively.  From these images it's rather difficult to find the yellow ink --- is it under the magenta, to the left of the magenta, or to the right?  This is easy to determine from the composite image, in which you can see the yellow between the cyan and magenta.

lines in red lines in green lines in blue color composite
red channel green channel blue channel composite


13 May 1999 by Scott Arrington